Choose bathroom fixtures while the layout and project scope are still taking shape, before rough plumbing and finish work begin. When selecting fixtures for a bathroom remodel, settle larger elements such as the sink, vanity, and shower or tub first, then choose faucets and hardware to complement them. This sequence gives dimensions, plumbing connections, clearances, and delivery timing a chance to align before installation.
It’s easy to focus on appearance first, but a fixture also needs to suit the room, feel comfortable in daily use, and work with the plumbing behind the wall. A finish or style you love won’t be practical if the fixture doesn’t fit the plan.
This guide explains how to coordinate fixture styles and finishes, check compatibility with planned plumbing, and confirm model details, required parts, and lead times before work progresses. You’ll also find a practical checklist for assessing scale, use, cleaning, and accessibility, so your choices form a considered plan rather than a series of last-minute decisions.
Key Takeaways
- Choose the sink, vanity, and shower or tub early, then select smaller fixtures to suit the layout and overall design.
- Coordinate finishes by considering their undertones, sheen, and how they look together under similar lighting.
- Assess dimensions, supply and drain locations, valve depth, clearances, and mounting needs against the bathroom plan before construction.
- Confirm fixture models, required valves and accessories, and delivery timing before rough work and ordering move ahead.
- Include comfort, accessibility, cleaning, and water use in the decision; according to the U.S. Environmental Protection Agency (EPA), WaterSense-labeled bathroom sink faucets and accessories use a maximum of 1.5 gallons per minute.
1. When should bathroom fixtures be selected?
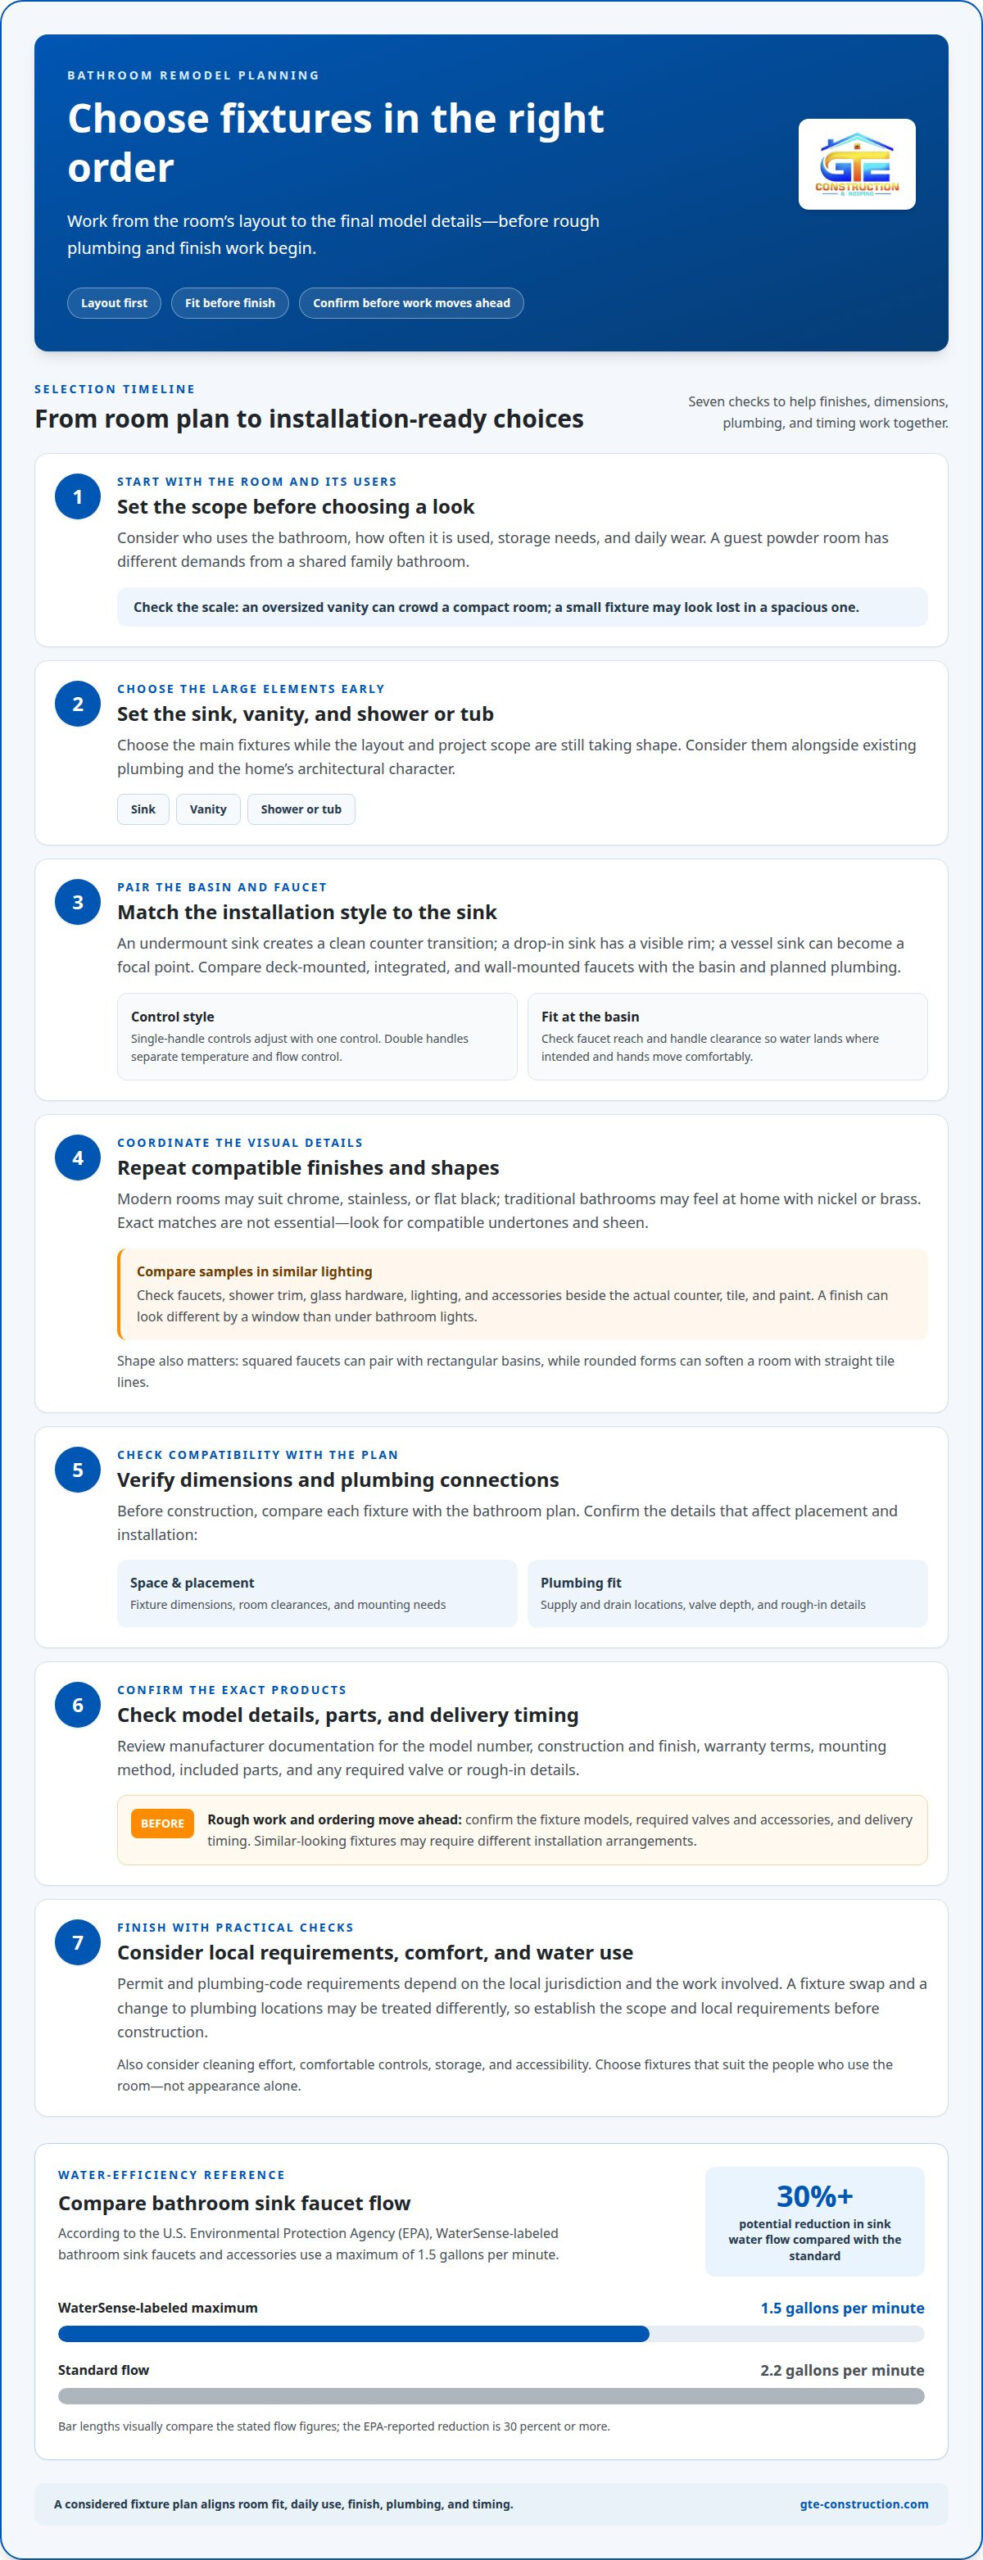
Choose bathroom fixtures while the layout and project scope are still taking shape. Consider the sink, vanity, shower, and tub alongside existing plumbing and your home’s architectural character. Selecting fixtures for a bathroom remodel starts with how the room works, not with a finish sample. Consider how often the bathroom is used, who uses it, what needs storing, and how much daily wear it receives. A guest powder room has different demands from a shared family bathroom. Match fixture scale to the room: an oversized vanity can crowd a compact space, while a small fixture may look lost in a spacious one. Look at nearby rooms, such as the kitchen, for cues about wood tones, metal finishes, and whether the home leans modern or traditional.
The right sink and faucet combination depends on room size, use, and preferred style. An undermount sink creates a clean transition with the counter, while a drop-in sink offers a flexible, rimmed installation. A vessel sink can create a focal point in a powder room. Compare deck-mounted, integrated, and wall-mounted faucets with the sink and planned plumbing. Single-handle controls simplify adjustment, while double handles allow separate temperature and flow control. Confirm the faucet reach and handle clearance suit the basin, so water lands where intended and hands move comfortably.
For a cohesive look, coordinate fixture shapes and finishes with details already in your home. A modern room may suit chrome, stainless, or flat black; a traditional bathroom may feel at home with nickel or brass. Exact matches aren’t essential. Instead, repeat compatible undertones and sheen across faucets, shower trim, glass hardware, lighting, and accessories. Compare samples in similar lighting, since a finish can look different beside a window than under bathroom lights. For each model, review manufacturer documentation for its construction and finish, warranty terms, mounting method, included parts, and required valve or rough-in details. Similar-looking fixtures may require different installation arrangements.
There isn’t one nationwide permit rule for every bathroom fixture replacement. Applicable plumbing codes and permit requirements depend on the local jurisdiction and the work involved; a fixture swap and a change to plumbing locations may be treated differently. Establish the project scope and local requirements before construction begins, then include them in the work plan. This helps prevent a fixture choice from conflicting with the planned plumbing or layout.
Water-efficiency ratings help compare expected faucet flow. According to the U.S. Environmental Protection Agency (EPA), WaterSense-labeled bathroom sink faucets and accessories use a maximum of 1.5 gallons per minute and can reduce sink water flow by 30 percent or more compared with the standard 2.2 gallons per minute. For daily use, consider cleaning effort, comfortable controls, storage, and accessibility alongside appearance. A cohesive choice works with the house, fits the room, and suits the people who use it.
2. Coordinating fixture finishes and styles
A cohesive bathroom repeats finishes without making every fixture identical. Start with a dominant finish, such as brushed nickel on the faucets, then repeat it on shower trim or cabinet hardware. Introduce a second metal only when its undertone and sheen work alongside the first. For example, warm brass can complement neutral tile, while polished chrome offers a brighter contrast. Compare faucets, shower hardware, glass fittings, lighting, and accessories under similar lighting. A finish that looks soft in daylight may appear stark beneath warm bulbs. Brushed nickel can also resist fingerprints and water spots, making it a practical choice for frequently handled fixtures.
Shape matters as much as finish. Pair a squared faucet with a rectangular basin, or choose rounded forms to soften a room of straight tile lines. An undermount sink creates a seamless counter edge, while a drop-in basin has a visible rim. A vessel sink can become a focal point, especially when the vanity and counter remain visually simple. Choose a basin to suit the available space and cleaning needs. Then check that the faucet’s reach and handles suit its depth and shape rather than crowding the bowl.
Handle operation should feel natural during everyday tasks. A single-handle faucet makes adjustments with one control, while double handles separate hot and cold water controls. Touchless faucets offer another streamlined option. Consider who uses the bathroom and whether controls are easy to grip and reach. A sculptural cross handle may complement traditional details, but a lever can be easier to operate with a full hand. Matching the handle profile to cabinet pulls can connect parts of the room without repeating identical shapes.
Showerhead choices affect both the room’s visual balance and daily routine. A fixed showerhead keeps the wall appearance simple; a handheld model can be removed for cleaning and bathing. Some handheld models offer different spray settings for tasks such as cleaning or bathing children. Dual shower fixtures can allow more than one person to use the shower at a time. Coordinate visible shower trim with faucet finishes, then consider how controls and showerheads relate to tile lines and glass hardware.
Before an update, view finish samples beside the actual counter, tile, and paint. Compare the surfaces under the room’s lighting, then note which finishes repeat and where a contrasting accent belongs. This small design check helps prevent a polished faucet from competing with matte shower trim or bright cabinet pulls. For a bathroom remodel, coordinated fixture and finish planning can connect these choices to the wider room design.
3. Compatibility with existing plumbing
A fixture can look right and still conflict with the bathroom’s plumbing layout. Check compatibility while developing the project scope, before ordering fixtures or starting rough work. Compare the planned sink, faucet, shower, and tub locations with existing supply lines, drains, and valves. If the layout changes, those connections may need to move too. A wall-mounted faucet, for example, requires a different mounting arrangement from one installed on the sink deck. Identify these requirements early so the fixture choice and installation plan work together.
Start with the actual bathroom plan, not a product photo or showroom display. Record each fixture’s width, depth, and height, then compare these dimensions with the available space. For a vanity sink, include the cabinet footprint and counter overhang. Check that doors and drawers can open without hitting a toilet, shower glass, or nearby wall. A basin may fit the countertop but leave too little room for faucet handles or comfortable movement. The plan should show fixture positions and surrounding clearances.
Next, match each fixture’s connection points to the supply and drain locations. A sink’s drain position affects the basin and cabinet layout, while faucet supply connections must reach the selected faucet. Compare the fixture’s mounting needs with its installation surface. A deck-mounted faucet, wall-mounted faucet, and integrated faucet each relate differently to the sink and wall. Check the manufacturer’s dimensions against the drawn plan, including any space needed behind or beneath the fixture.
Shower valves need particular attention. Before rough work, identify the selected valve and its required placement, then compare its depth and position with the planned wall finish and shower trim. A trim kit designed for one valve may not fit another. The same principle applies to tub controls and diverters. Confirm the complete fixture combination together, rather than treating visible trim as a stand-alone purchase. This helps ensure proper control placement and a clean finished installation.
Include electrical requirements in the same coordination process. Some bathroom fixtures need an electrical connection, so their location must align with the room plan and intended use. Review fixture documentation alongside plumbing requirements, not after walls or finishes are underway. For example, a fixture near a cabinet may compete for space with stored items, access panels, or connection points. Note these relationships on the plan before installation begins.
A practical compatibility review follows a clear sequence: mark fixture locations, compare product dimensions, locate supply and drain connections, check valve depth and mounting needs, then review clearances and electrical requirements. Keep model documents with the plan so every measurement refers to the intended fixture. This coordinated check protects both function and appearance, and helps prevent a late fixture substitution from disrupting the cabinet, plumbing, or finished layout.
4. Confirming model numbers, valves, accessories, and lead times
Before rough work begins, confirm the exact model number for every faucet, shower trim, toilet, and sink. Similar-looking products can require different valves, mounting hardware, or connection parts. Match each model with its manufacturer documents, then record the required valve, drain assembly, handles, and accessories. For example, treat shower trim and its valve as a compatible pair, not as separate choices. This written record gives the installation plan a clear reference and reduces the chance of missing parts when work is underway.
Check product documents for installation requirements, included components, and parts sold separately. Confirm the valve model and placement before the wall is closed, since the trim must fit the installed valve. For a faucet, establish whether the drain assembly is included and whether the sink configuration supports it. Keep packaging labels or order records with the model details. If you purchase fixtures yourself, have the written project scope specify exact products, delivery timing, responsibility for missing parts, returns, and warranty handling.
Lead times affect when fixtures arrive and installation can proceed. Confirm expected delivery timing before setting the work sequence, then coordinate delivery with the stage when each item is needed. A delayed shower valve can hold up wall completion, while late cabinet hardware may affect finishing work. Keep an order record with model numbers, quantities, and delivery dates. If an item changes, update the record and reassess paired components before work continues.
Let daily use guide decisions about accessibility and cleaning. Check whether handles are easy to grip, controls are within comfortable reach, and surfaces can be cleaned without awkward angles. In a shared bathroom, clear and simple controls may be especially useful. Consider whether exposed hardware has seams or shapes that collect residue, and whether serviceable components remain accessible for repairs. A fixture’s appearance matters, but its maintenance needs also shape long-term comfort.
Toilet height is another practical comparison. The research figures describe taller bathroom toilets as 16 to 18 inches high, compared with standard toilets at 14 to 15 inches. Consider how each height feels for the intended users, along with room clearances and the existing plumbing position. Toilet prices vary by model and features, so compare the complete specification rather than choosing by appearance alone. Confirming the model, fit, included parts, and installation details before ordering helps align comfort with the project schedule.
5. Bathroom fixture checklist
A useful checklist tests each choice against the room, its users, and the installation plan. Review it during renovation planning, before fixture orders are final. Start with the larger pieces: sink, vanity, and shower or tub. Their dimensions shape available storage, movement, and placement for smaller hardware. For example, a compact vanity may leave limited counter space for a wide faucet or soap accessories.
- Fit and clearances: Compare fixture dimensions with the room plan. Check that cabinet doors open freely and users can reach controls without leaning across a basin.
- Daily operation: Consider faucet use, grip, reach, and water control. A lever handle may be easier to operate than a small knob for someone with limited grip.
- Cleaning and durability: Assess whether the fixture’s shape is easy to wipe and whether its surface shows fingerprints or water spots. Check that serviceable parts remain accessible for repairs.
- Storage and seating: Account for toiletries, towels, and any seating needs. A vanity with drawers may serve a shared bathroom differently from a pedestal sink.
- Shower function: Decide whether a fixed or handheld showerhead better suits bathing and cleaning. A handheld model can be removed for bathing or rinsing the shower area.
Water flow belongs on the checklist, too. According to the U.S. Environmental Protection Agency (EPA), WaterSense-labeled bathroom sink faucets and accessories use a maximum of 1.5 gallons per minute and can reduce sink water flow by 30 percent or more compared with the standard 2.2 gallons per minute. The U.S. Department of Energy states that WaterSense-labeled residential bathroom lavatory faucets must have a maximum flow rate of 1.5 gpm or less, 32% below the federal standard. These details give homeowners a concrete basis for comparing eligible faucets.
For the basin, compare maintenance needs with the available counter and vanity space. An undermount sink gives the counter a continuous edge, while a vessel basin sits above it and needs a faucet with suitable reach. Include the drain assembly and mounting method in the same review. For toilets, assess user comfort, room clearances, plumbing fit, and cleaning access together, rather than treating height as the only decision.
Before approval, use the checklist to confirm model details, included parts, valve pairing, dimensions, and delivery timing. A written record connects each choice to its installation requirements and supports a more orderly renovation. For help coordinating these decisions within a complete bathroom remodel, plan your bathroom remodeling project.
GTE Construction & Roofing: Bathroom Remodeling
GTE Construction & Roofing provides bathroom remodeling for homeowners planning fixture updates or a complete room renovation. Turn to the team when sinks, faucets, shower fixtures, and finishes need to work with the bathroom layout and plumbing plan. As a fully licensed and insured general contractor serving Alameda County and Contra Costa County, GTE Construction & Roofing can coordinate fixture decisions as part of the remodel, linking appearance, fit, and installation requirements before work moves forward.
Whether you’re updating a vanity and fixtures or reworking the room, a clear plan helps align the design with daily use. Bring your preferred styles and priorities to the remodeling discussion so they can inform the project scope and fixture planning.
Contact GTE Construction & Roofing to discuss your bathroom remodeling project.
Make Your Bathroom Plan Work for You
The most rewarding fixture choices support your routines and still feel right as your home evolves. Before moving ahead, decide which qualities matter most in the finished room: ease of use, straightforward care, a calm visual style, or a balance of all three. That priority can guide final decisions when several options seem equally appealing.
Thoughtful selecting fixtures for a bathroom remodel means treating each decision as part of a room you’ll live with every day, not as an isolated purchase. With a clear sense of how you want the space to function and feel, you can move from inspiration to a practical remodeling plan with greater confidence.
If you’re ready to plan the next stage of your bathroom renovation, contact GTE Construction & Roofing to discuss your project. A considered plan is a strong starting point for a bathroom that feels distinctly yours.
Frequently Asked Questions
When should bathroom fixtures be selected?
Select fixtures during planning, before ordering and rough work begin. First settle the room’s layout, who uses it, and the main pieces, such as the vanity and shower. Then match smaller items to those decisions. For example, finalize the sink style before choosing a faucet with suitable reach. Keeping model details with the plan connects each selection to its installation requirements.
Can I purchase my own fixtures?
Yes, homeowners can often purchase their own fixtures if the written project scope identifies the exact products and responsibilities. For example, it should clarify who coordinates delivery and handles missing parts, returns, or warranty matters. Keep receipts, model numbers, and manufacturer documents together, then inspect delivered packages against the order. If a component is missing or a model changes, resolve the difference before installation depends on it.
Should every metal finish match exactly?
No, metal finishes can differ and still create a coordinated room. Repeat one finish across prominent plumbing hardware, then use a contrasting finish selectively, such as a different tone on a mirror frame or light fixture. Compare undertones and sheen, not just finish names. A warm metal paired with another warm-toned accent can feel deliberate, while unrelated finishes may look accidental side by side.
What should I consider besides appearance?
Consider daily use, comfortable reach and grip, cleaning effort, water control, and access to parts that may need service. A shared bathroom used by children, for example, may benefit from simple controls and a handheld showerhead for rinsing. Check whether surfaces show fingerprints or water spots, and whether stored items fit the vanity. These practical details help determine whether a fixture will suit your household after renovation.
Why should I visit a bathroom showroom?
A showroom lets you compare actual finishes, assess fixture scale, and handle controls before deciding. Seeing a faucet beside a sink can reveal proportions that are hard to judge in a product image. Bring tile or counter samples to compare colors under similar lighting. Note questions about mounting and included components, then carry the answers into your fixture plan.
What bathroom fixtures should you choose for a remodel?
Choose fixtures that suit the room’s dimensions and how people use it. For a compact powder room, a pedestal or vessel sink may preserve a sense of space; a full bathroom may call for a vanity with useful storage. Pair the basin with a faucet that reaches comfortably, then choose shower controls and a showerhead suited to bathing and cleaning needs. Include toilet comfort and service access in the same plan.
How do you measure a bathroom for new fixtures?
Measure the room and record the position of fixed features before comparing products. Note wall lengths, door swings, cabinet dimensions, and the locations of drains, supply lines, and shower valves. Then compare each fixture’s width, depth, and height with the available space. For example, check that a vanity drawer can open without hitting the toilet. Include clearance around the fixture, not just its footprint on the plan.
How much do bathroom fixtures cost, including installation?
Fixture and installation costs depend on the products selected and the work required. Materials, features, delivery, plumbing changes, site access, and project scope all affect the total. Replacing a fixture in its existing position differs from changing its location or connections. For remodeling work, the price depends on the project and is provided after a quote request. Compare the complete project scope, not just the fixture.