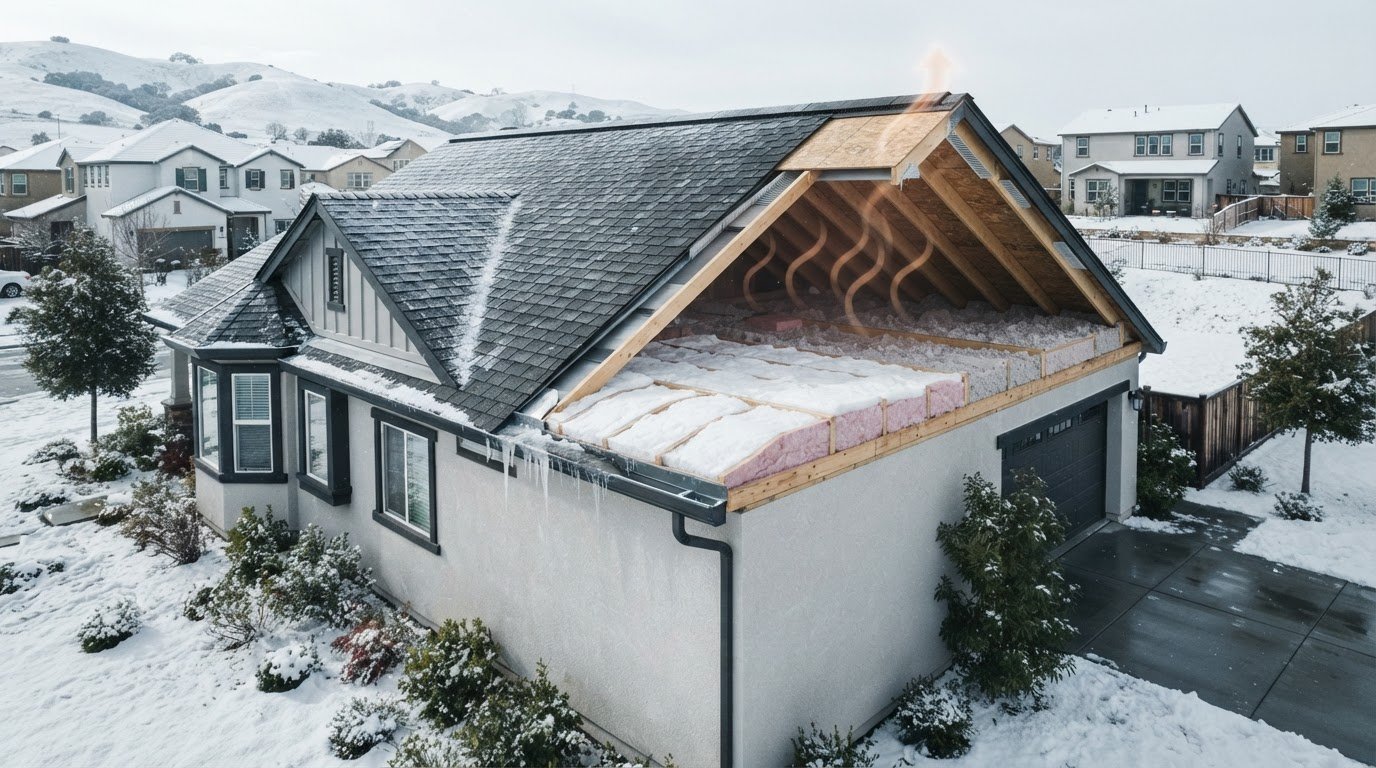
The most effective way to prevent ice dams may be to start inside your home, not on the roof. If you’re wondering how to prevent ice dams on roof surfaces, focus on limiting heat escaping into the attic and reducing uneven roof temperatures.
Snow or ice gathering at the eaves can be concerning: melting and refreezing may trap water, which can seep beneath roofing and damage ceilings or walls. But reaching for a roof rake or adding insulation without identifying the cause may miss the real issue. Ice dams form when heat warms part of the roof, snow melts, and runoff refreezes at the colder edge. The risk depends on winter conditions, so guidance written for consistently snowy climates may not fit every California home.
This guide explains what causes ice dams, what you can do before and during winter, and how to respond safely when ice builds up. You’ll learn how insulation, air sealing, ventilation, roofing, and gutters can play a role, plus when professional attention is the safer choice. The goal is to help you protect your home with practical steps that address contributing conditions, not just visible ice.
Key Takeaways
- Learn how heat escaping into the attic can warm roof sections, melt snow, and contribute to ice dams.
- Understand how to prevent ice dams on roof surfaces by addressing attic conditions, not relying only on temporary winter measures.
- Use a seasonal plan to spot potential concerns safely, prepare roof drainage, and respond carefully during freezing weather.
- Recognize when recurring ice, roof-edge damage, or signs of interior moisture call for a professional roofing review.
- See how roofing repair, installation, and gutter work can address related roof-system or drainage concerns.
How to prevent ice dams on a roof: understand the risk first
Preventing a roof leak starts with understanding how water can become trapped at the roof edge. An ice dam isn’t simply a buildup of snow or a large icicle. It forms when snow melts on a warmer part of the roof, then the meltwater reaches a colder eave and freezes. As more water drains down and refreezes, the ridge of ice can grow.
An ice dam is a ridge of ice at a roof’s edge that blocks melting snow from draining, allowing water to back up and potentially enter the home. Water can move beneath shingles or through vulnerable joints and openings in the roof assembly. A sound roof helps protect the home, but even small gaps or damaged areas may become pathways for backed-up water. This overview explains ice dam formation.
Snow and freezing weather create the opportunity, but they aren’t the whole explanation. Uneven roof-surface temperatures are central: one area may be warm enough to melt snow while the eave remains cold enough to refreeze runoff. Heat escaping from the home can contribute to that temperature difference, as can the roof’s sun exposure and changing weather. That’s why the answer to how to prevent ice dams on roof surfaces starts with identifying conditions at the specific home, rather than treating every snowfall as an equal threat.
What happens when an ice dam forms?
As the ice ridge impedes drainage, meltwater may collect behind it instead of flowing off the roof. The backed-up water can work into vulnerable parts of the roof assembly and eventually show inside as a damp ceiling, a stain, or a wet area on a wall. These signs don’t identify the cause on their own, but after snowy, freezing weather they warrant prompt attention. Don’t climb onto an icy roof to investigate.
Which California homes should pay closer attention?
Risk depends on sustained snow and freezing conditions, not on the state name alone. Coastal locations such as San Francisco generally have milder winter conditions than colder inland or elevated areas, but local weather and a home’s exposure still matter. Conditions can vary across Sacramento and nearby areas, too. Pay attention to the weather your home actually experiences, especially when snowfall is followed by freezing temperatures.
Roof design and condition also influence how a home responds to winter weather. Roof sections with different sun exposure may warm and cool unevenly, while vulnerable roof edges or existing damage can increase concern if meltwater backs up. A visual check from the ground after a storm can help you notice heavy ice buildup or interior moisture without putting yourself on a ladder. These observations are a useful first step. Next, distinguish lasting prevention measures from temporary responses to active icing.
How attic heat loss and roof temperature create ice dams
After snow settles, the roof’s temperature can vary from one area to another. Heat escaping from the rooms below may warm parts of the attic and roof, melting snow above those warmer spots. Water then flows toward colder eaves, where it can freeze. That cycle can repeat while snow, suitable temperatures, and uneven roof conditions persist.
Uneven roof temperatures create the melt-and-refreeze pattern that can allow an ice dam to develop. The aim is to reduce unnecessary heat reaching the roof and support a well-designed attic and roof assembly. Building Science Corporation’s overview of the causes and solutions for ice dams explains how heat flow and roof temperatures contribute to the problem.
Where does unwanted attic heat come from?
Two contributors are easy to confuse. Air leakage occurs when warm indoor air passes through openings in the ceiling plane, such as gaps around wiring or plumbing, an attic hatch, or other penetrations. Inadequate or uneven insulation is different: it slows heat transfer less effectively, allowing warmth to move from living spaces into the attic. Either can contribute, and they can occur together.
For a practical first check, look for visible gaps around the attic access and ceiling penetrations from a safe, accessible location. Notice whether insulation appears thin, displaced, or missing in patches, but don’t assume that adding insulation alone will close air leaks. A bathroom exhaust duct that releases moist air into the attic also deserves attention; exhaust should be directed outdoors. Avoid stepping onto ceiling material or moving insulation around electrical equipment.
How do insulation and ventilation work together?
Insulation slows heat moving from the home into the attic. Air sealing limits warm air passing through openings. Ventilation, when properly designed for the roof assembly, supports airflow that can help manage attic heat and moisture. These measures work as a system, not as substitutes for one another. The right insulation level depends on the home’s climate zone and applicable current requirements, so a generic target may not fit every California property.
Use this order to focus an assessment:
- Find air pathways: Check accessible areas around hatches and ceiling penetrations for visible gaps.
- Assess insulation: Look for uneven coverage or compressed areas, and consider the whole ceiling plane rather than one conspicuous spot.
- Review airflow: Confirm that vents are not blocked and that the existing intake and exhaust arrangement suits the roof design.
Adding a vent without considering the full assembly may not resolve heat loss and can affect moisture control. Likewise, more insulation won’t correct every air leak. If recurring ice coincides with roof concerns, a roofing review can help assess the roof system alongside attic conditions. GTE Construction & Roofing provides residential roofing repair and installation to address roofing issues as part of a broader prevention plan.
Which ice-dam prevention measures address the cause, and which are temporary?
Once you understand how uneven roof temperatures contribute to icing, it’s easier to separate lasting improvements from short-term responses. Air sealing, suitable insulation, and a coordinated ventilation review can address conditions that contribute to melting and refreezing. By contrast, clearing snow or managing ice at the roof edge may help during a particular storm, but won’t correct heat escaping from the home.
Lasting prevention addresses heat flow through the home; temporary measures manage immediate winter conditions. That distinction is central to how to prevent ice dams on roof surfaces: assess the causes first, then use safe, limited measures to manage a developing winter hazard.
Which improvements target the underlying causes?
Start by identifying air leaks at the ceiling plane, including gaps around attic hatches and service penetrations, before treating insulation as the only answer. Sealing suitable openings can reduce warm air entering the attic. Next, assess whether insulation is continuous and appropriate for the home’s climate zone and applicable requirements. A single thin patch may point to an issue, but it doesn’t establish what the whole attic needs.
Ventilation should be considered as part of the roof-and-attic assembly, not as a universal retrofit. Existing vent placement, airflow paths, and moisture-control needs matter. Adding vents without understanding the assembly may leave the underlying heat loss unchanged or disrupt how moisture is managed. A coordinated assessment helps determine whether air sealing, insulation work, ventilation adjustments, or a combination makes sense for that home.
What can winter measures, and gutters, actually do?
During snowfall, a roof rake used from the ground may remove some snow near the eaves and reduce the amount available to melt and refreeze. It’s a limited, weather-dependent tactic, not a repair for attic heat loss. Follow the tool’s instructions, work from stable ground, and stop if snow or ice conditions make the task unsafe.
- Heating cables: Roof-edge cables may help manage limited icing in specific areas, but they don’t correct warm-air leakage or inadequate insulation. They aren’t a substitute for addressing the underlying conditions.
- Gutters and downspouts: Keep them clear of leaves and other obstructions so water can drain when conditions allow. Clear drainage supports roof maintenance, but it can’t prevent snow from melting or water from refreezing at a cold eave.
- Ice removal: Don’t climb onto an icy roof or strike ice with a tool. Falls are a serious hazard, and forceful removal can damage shingles, flashing, or gutters.
Think of these steps as complementary, not interchangeable. Drainage maintenance and cautious snow management can support a seasonal plan, while improvements to the home’s heat flow target conditions that encourage recurring ice dams. If ice keeps returning or roof-edge materials appear damaged, a professional roofing review can help identify concerns that a ground-level check can’t resolve.

A practical seasonal plan to reduce ice-dam risk
Preparation before winter can help you spot roof and attic concerns before snow or freezing weather arrives. Use this sequence to organize checks safely. It won’t guarantee that ice dams won’t form, but it can help you address contributing conditions and respond more calmly if winter weather creates a risk.
- Inspect from safe locations. From inside, look for old ceiling stains, damp patches, or signs of past moisture. From the ground, note visible roof-edge damage, heavy ice buildup, or areas where drainage appears obstructed. Don’t climb a ladder or walk onto the roof to investigate.
- Review attic conditions. Arrange an attic assessment before winter if you’ve noticed recurring icing or indoor moisture. The review can look for visible air leaks, uneven insulation, and ventilation concerns, helping identify whether improvements to the attic or roof assembly are appropriate.
- Prepare drainage. Before winter weather, clear accessible gutters and downspouts from a safe position. If the work requires a ladder near slippery surfaces or roof edges, wait for safer conditions or arrange appropriate help. Clear drainage supports water flow, although it can’t prevent the roof from warming and cooling unevenly.
- Monitor winter conditions. During snowfall and freezes, observe the roof from the ground and keep a record of where ice repeatedly forms. Recurring buildup is useful information, but it doesn’t prove a single cause. Note when it appears and whether indoor dampness follows.
What should homeowners check before winter?
Pay attention to indoor patterns as well as visible roof conditions. A stain that reappears after winter weather, a damp ceiling, or a wet wall area deserves investigation rather than a quick cover-up. An attic review can help connect those observations with air leakage, insulation coverage, or ventilation. Addressing concerns before a storm makes it easier to plan carefully instead of making rushed decisions in icy conditions.
What should you do during a freeze or leak?
Don’t climb onto a snowy or icy roof, chop at ice, or use improvised heat sources near roofing materials. Those actions can put you at risk or damage the roof. If water enters the home, move belongings away from the affected area, use containers to catch drips if it’s safe, and photograph dampness or staining. Arrange prompt attention to the source, especially if water is actively entering or the affected area is growing.
If repeated winter problems point to broader concerns with the roof system, a professional assessment can help determine whether repair or a larger project is appropriate. For significant roof-system work, explore professional new roof installation with GTE Construction & Roofing. A careful review can help you make informed decisions about the roof and its drainage before the next winter season.
When a roofing professional can help prevent recurring ice dams
Recurring ice buildup in the same area, visible damage along a roof edge, or interior dampness after winter weather are good reasons to arrange a professional roofing review. These symptoms don’t prove that a single roofing defect caused the problem, but they can point to conditions that deserve closer attention. A timely assessment can help distinguish visible roof or drainage concerns from attic heat-loss issues that belong in a separate part of the prevention plan.
That distinction matters. Roofing work can address damaged or vulnerable parts of the roof assembly, while attic air sealing and insulation improvements target heat moving from the home into the attic. Both areas may need attention. Understanding how to prevent ice dams on roof surfaces means considering all contributing conditions, not assuming that a repair or gutter change alone will prevent every recurrence.
What can a roofing review help identify?
A roofing review can assess visible roofing materials, roof edges, and drainage concerns in light of the symptoms you’ve observed. For example, recurring ice near a damaged edge or moisture appearing after a storm may warrant a closer look at the roof’s condition and water-management details. Photos taken safely from the ground and notes about when symptoms appear can make the discussion more specific.
- Roofing repair may address localized damage or vulnerable roof areas identified during the review.
- New roofing and installation can be appropriate when broader roof-system work is needed.
- Gutter repair or installation can address related drainage concerns, while recognizing that gutters don’t correct attic heat loss.
These are practical ways to address roofing and drainage issues as part of a broader plan. Lasting prevention may also involve evaluating attic air leakage, insulation coverage, and ventilation. Roofing work and attic improvements serve different functions, so keep both in view when ice dams return or water intrusion appears.
How can GTE Construction & Roofing support your next steps?
Bring together what you’ve noticed: where ice repeatedly forms, whether it follows particular weather, and whether ceilings or walls show signs of moisture. This record can help frame a clear project discussion around the roof’s visible condition and drainage needs. GTE Construction & Roofing provides residential roofing installation and repair, along with gutter installation and repair, for homeowners addressing related roof-system concerns.
If recurring icing, roof-edge damage, or interior moisture has raised questions about your roof, explore GTE Construction & Roofing and discuss a practical next step for your roofing or gutter project.
Take the next step toward a winter-ready roof
Turn what you’ve noticed into a clear picture of your home’s needs. Keep notes on recurring ice, roof-edge concerns, or moisture indoors, then use them to guide a focused review of the roof and attic. That gives you a more grounded starting point than reacting to ice alone and helps you make informed decisions about how to prevent ice dams on roof areas that repeatedly cause concern.
GTE Construction & Roofing serves homeowners in San Francisco, Sacramento, Alameda County, and Contra Costa County. If roof or drainage concerns are part of your winter-preparation plan, explore GTE Construction & Roofing to consider a practical next step for your home.
With an assessment and improvements suited to your property, you can approach the colder months with greater confidence and a clearer plan.
Frequently Asked Questions
Can ice dams form without snow on the roof?
A classic ice dam generally needs snow that melts and then refreezes at a colder roof edge. Without snow, that specific process is unlikely, though freezing rain or melting frost can still leave ice on roofing or in gutters. If you see ice during snow-free weather, note the conditions and watch for water intrusion rather than assuming it’s an ice dam. The source of the ice may need closer assessment.
Should I chip ice off my roof to prevent a leak?
No. Chipping can damage shingles, flashing, and gutters, and standing on an icy roof creates a serious fall risk. If you’re concerned about a leak, check ceilings and upper walls from indoors, and take photos of visible changes. Don’t use salt or improvised heat sources on roofing materials. If water is entering, focus on protecting the room and arranging prompt attention to the leak.
Can roof heating cables prevent ice dams?
Heating cables may help manage limited icing in selected roof-edge areas, but they don’t fix the conditions that cause uneven roof temperatures. They also need to be installed and used appropriately for the roof and electrical setup. For a plan addressing how to prevent ice dams on roof surfaces, consider cables a possible supplemental measure, not a substitute for evaluating attic heat loss, roof condition, and drainage.
Are clogged gutters the main cause of ice dams?
No. Clogged gutters can obstruct drainage, but they aren’t usually the underlying reason an ice dam develops. The pattern involves snow, freezing conditions, and differences in roof temperature. Keeping gutters and downspouts clear can help water drain when it reaches them, but it can’t prevent snowmelt from refreezing at the eaves. If a gutter repeatedly holds water or appears damaged, have its condition assessed.
What should I do if an ice dam is already causing a ceiling leak?
Protect people and belongings first. Move furniture and electronics away from the leak, place a container under drips if it’s safe, and take photos of the affected ceiling, walls, and possessions. Keep clear of bulging ceilings or water near electrical fixtures, and don’t climb onto the roof to remove ice. Record when the leak began, then promptly report the damage to your insurer and arrange an assessment of the roof.
Can ice dams happen in the San Francisco Bay Area or Sacramento?
They can occur when local weather brings the right combination of snow, melting, and freezing, but conditions vary by location and storm. San Francisco’s coastal conditions differ from colder inland or elevated areas, and Sacramento shouldn’t be treated as having uniform winter risk. Homeowners in San Francisco, Sacramento, Alameda County, and Contra Costa County can monitor local forecasts and pay attention to the conditions their own property experiences.
Does homeowners insurance cover damage from an ice dam?
Coverage depends on your policy, the circumstances of the loss, and how the damage is assessed, so don’t assume every ice-dam leak is covered. Review your policy’s water-damage provisions, exclusions, and deductible, then contact your insurer to ask how to document a potential claim. Keep dated photos and records of affected areas, and take reasonable steps to limit further damage without putting yourself at risk.