A truly functional kitchen island is a complex architectural installation, not just anchored cabinetry. You likely envision an inviting centerpiece for family gatherings and effortless meal preparation, but it is completely natural to feel hesitant about whether your existing space can handle it. Worries about creating cramped walkways, cutting through finished subfloors for plumbing and wiring, or managing disorganized trades can easily turn an exciting upgrade into a stressful undertaking. Relying on professional kitchen island installation services through a licensed builder ensures your vision comes to life safely without sacrificing daily comfort.
In this guide, you will discover how meticulous planning transforms your floor plan, integrates modern utilities seamlessly, and maintains complete building code compliance. We will walk through standard clearance dimensions for optimal workflow, examine how structural framing and utility trenching are executed properly, and show you how to choose a qualified general contractor to oversee every detail from foundation to finish.
Key Takeaways
- Evaluate essential aisle clearances to maintain comfortable walking zones and prevent congestion around open appliances.
- Discover the mechanical requirements for roughing in plumbing, electrical circuitry, and ventilation beneath existing subfloors.
- Compare structural longevity and tailored storage configurations between custom carpentry and prefabricated modular cabinets.
- Follow the sequential construction stages that experienced builders use to secure lasting durability from framing to finish.
- Learn why investing in professional kitchen island installation services from a single general contractor eliminates subcontractor disputes and protects building code compliance.
Evaluating Kitchen Floor Plans for Island Feasibility and Traffic Flow
Every successful kitchen remodel begins with rigorous spatial analysis rather than surface aesthetics. While standard retail guides often suggest that any kitchen can accommodate a freestanding feature, professional kitchen island installation services start by evaluating clearance tolerances before a single cabinet is ordered. Incorporating a stationary kitchen island permanently alters interior pathways. Without precise planning, an ill-proportioned unit quickly turns a bustling family kitchen into an irritating, hazardous bottleneck.
Work Triangle Clearances and Walkway Dimensions
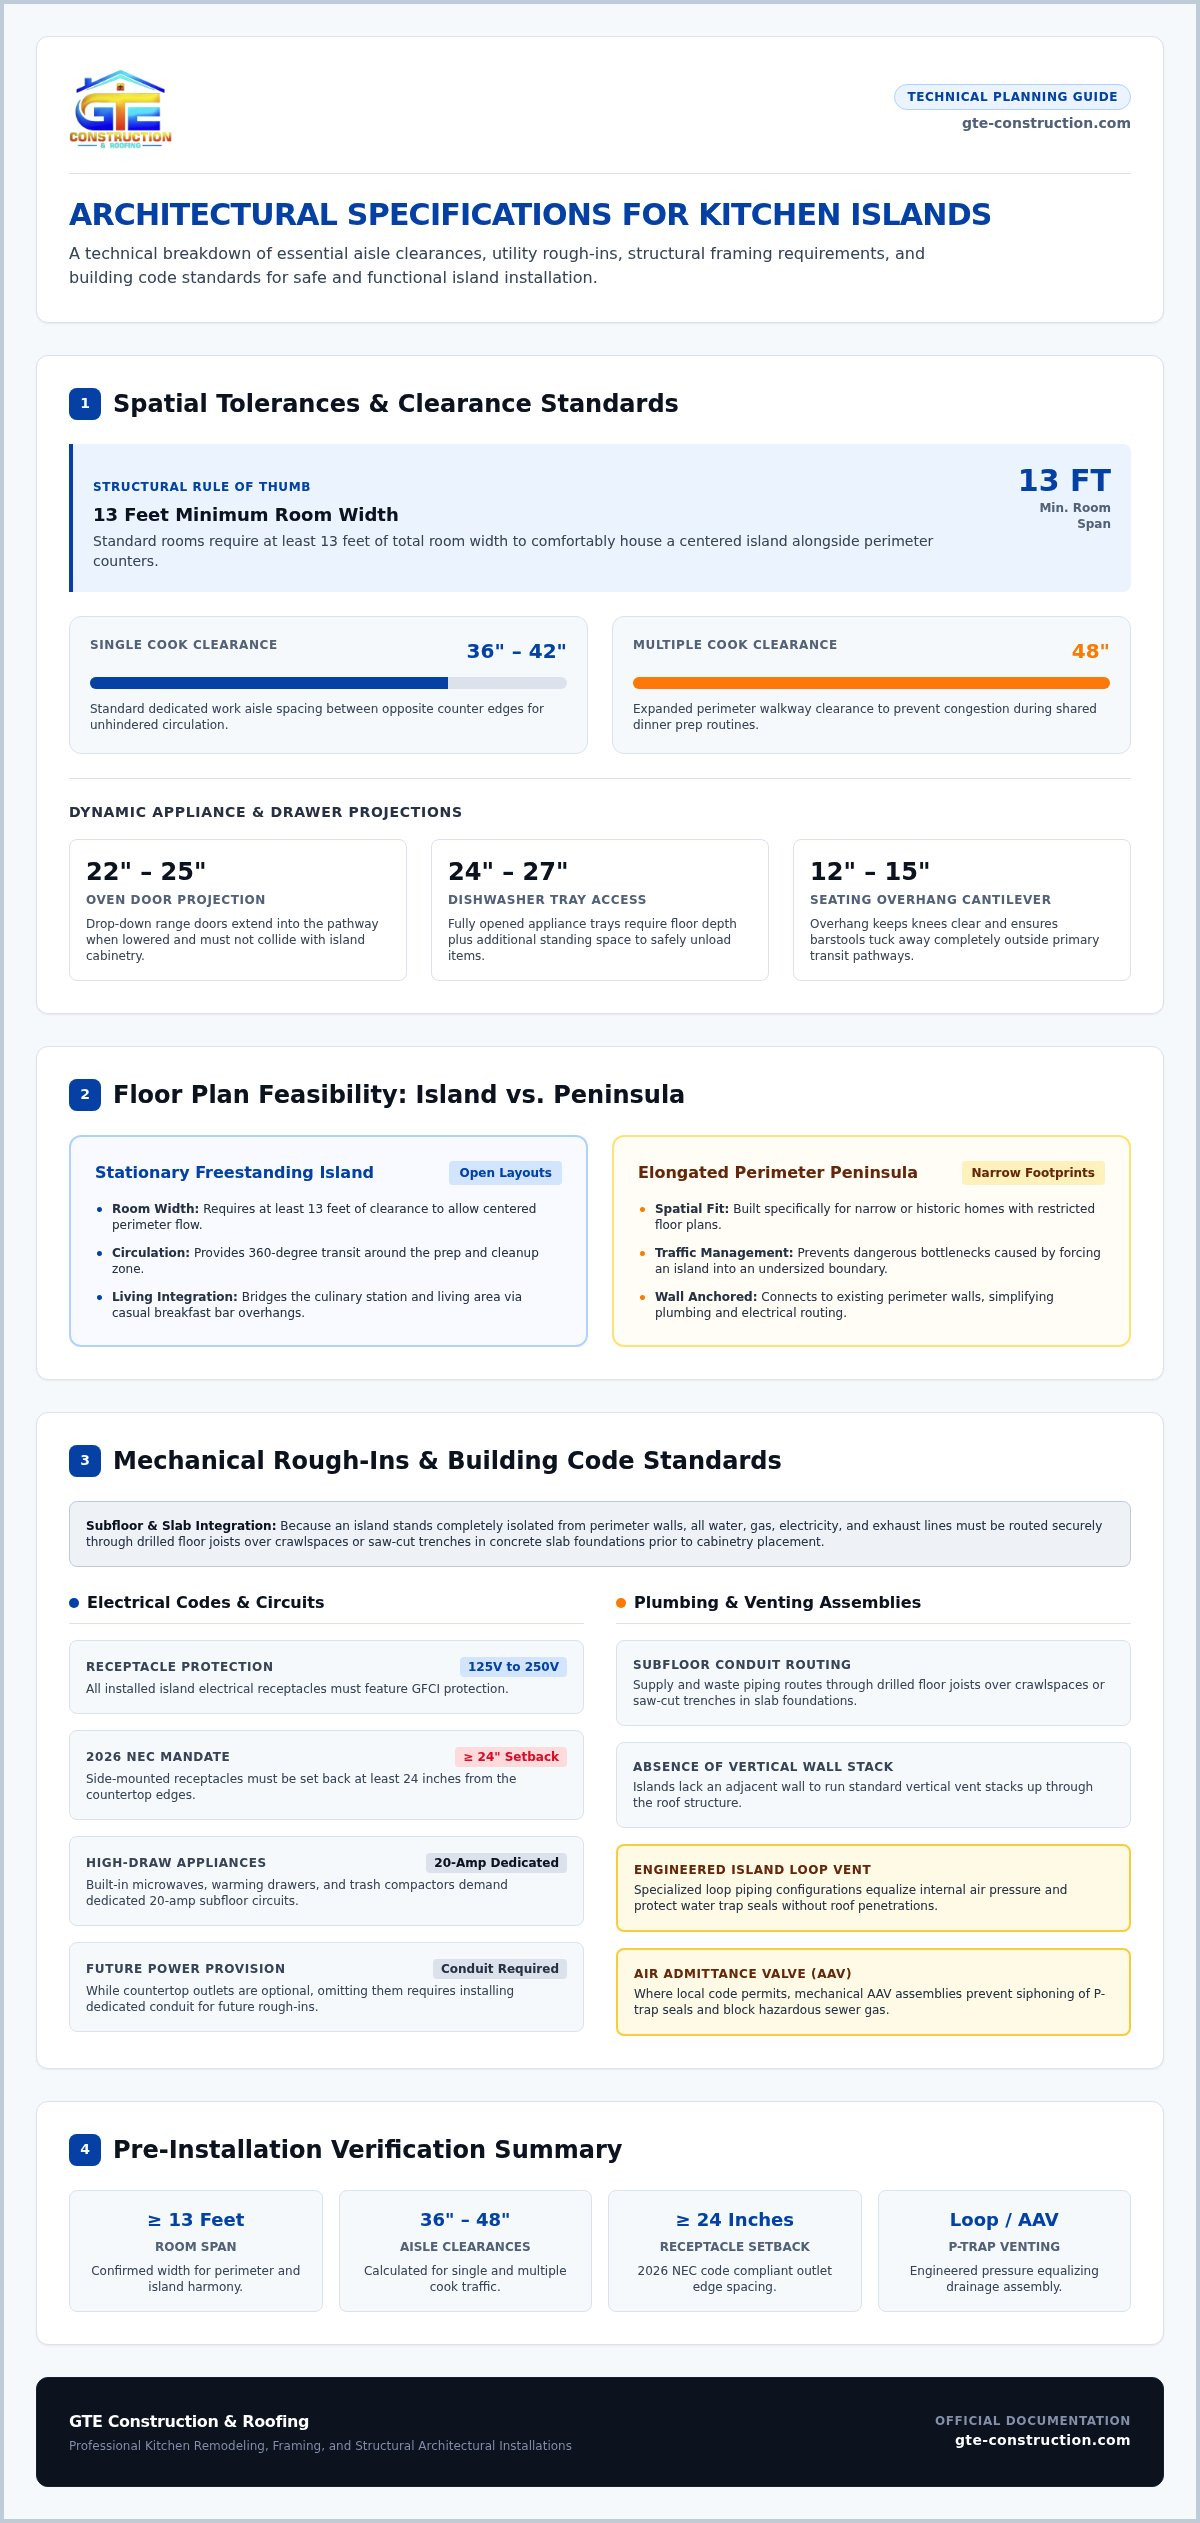
Safe kitchen navigation depends on maintaining unhindered circulation between your primary cooktop, refrigeration unit, and cleanup zone. A dedicated work aisle requires a minimum clearance of 36 to 42 inches between opposite counter edges for a single cook. In active households with multiple cooks sharing prep zones, expanding perimeter walkways to 48 inches prevents congestion during busy dinner routines.
Precise planning accounts for full equipment clearances rather than just static counter faces:
- Oven door projection: Drop-down ranges often extend 22 to 25 inches into the pathway when lowered.
- Dishwasher access: Fully opened appliance trays demand at least 24 to 27 inches of dedicated floor space, plus standing room to unload dishes safely.
- Pull-out drawer glide: Deep base organizers and pull-out waste containers need room to extend fully without striking opposite cabinetry.
Island Proportions for Closed and Open Floor Plans
An island must complement the scale of the room. As a practical structural rule, standard rooms require at least 13 feet of total width to house a centered island alongside perimeter counters comfortably. In expansive open layouts, an extended island anchors the room, bridging the culinary zone and family living area with multi-tiered surfaces or a casual breakfast bar. Seating overhangs require a minimum 12-to-15-inch cantilever, keeping knees clear and ensuring barstools tuck away neatly outside main transit paths.
In narrow or historic homes with tight footprints, an elongated peninsula often proves far more practical than forcing an island into an undersized boundary. Experienced kitchen island installation services evaluate these structural real estate trade-offs early. This disciplined planning protects your investment and ensures daily movement feels effortless and natural.
Utility Rough-Ins: Electrical, Plumbing, and Ventilation Integration
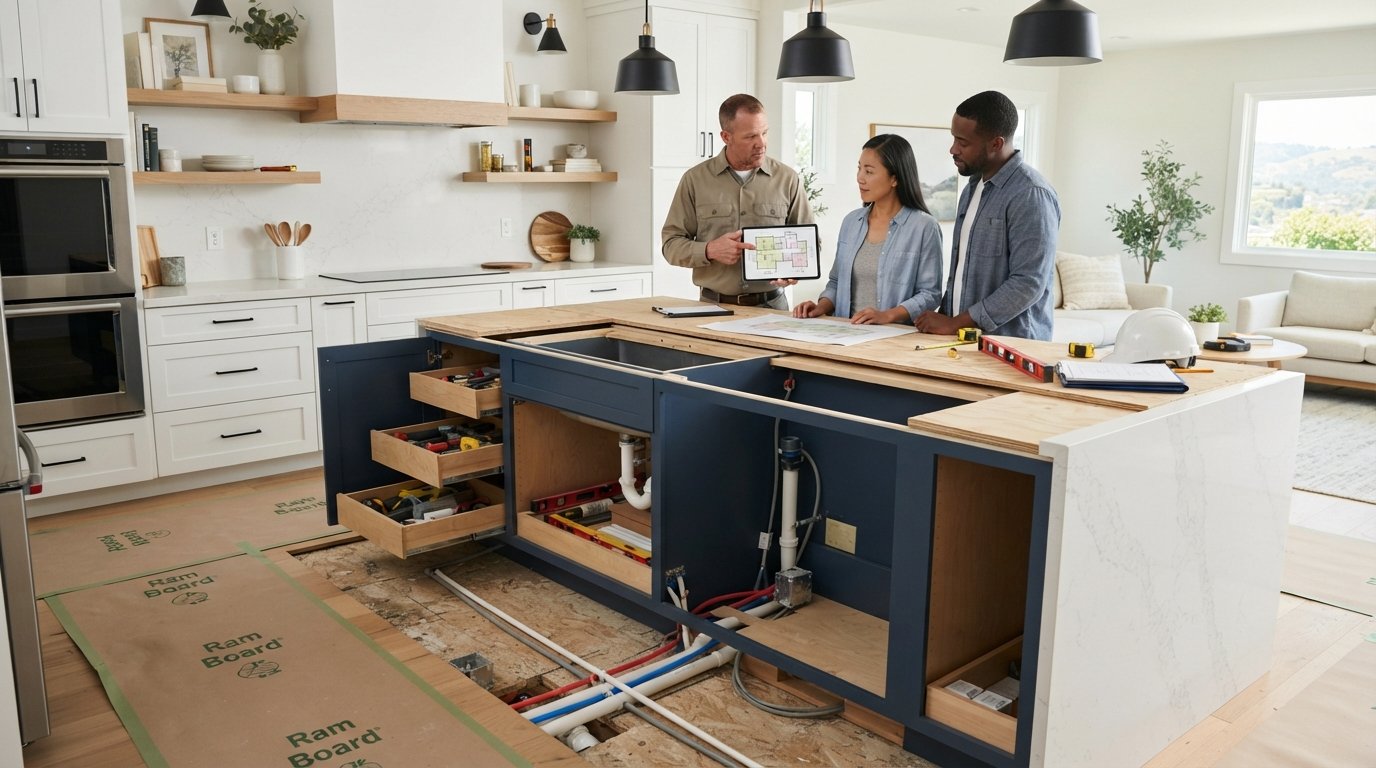
Transforming a freestanding cabinetry unit into a fully functional culinary prep station requires precise mechanical rough-ins. Perimeter cabinets hide wiring and piping behind drywall, but an island stands completely isolated. Bringing water, gas, electricity, and exhaust to the center of the room requires cutting into finished subfloors or trenching into concrete foundations. Comprehensive kitchen island installation services integrate these mechanical systems into the architectural framing before cabinetry arrives on-site.
Code-Compliant Electrical Outlets and Dedicated Circuits
National retail guides often overlook stringent building codes, but electrical safety is critical. Modern National Electrical Code standards specify that while island countertop outlets are optional, omitting them requires installing a dedicated conduit or rough-in provision for future power. Any receptacles installed must feature GFCI protection on 125V through 250V circuits. Additionally, the 2026 NEC mandates that side-mounted receptacles sit set back at least 24 inches from countertop edges. High-draw appliances, including built-in microwaves, warming drawers, and trash compactors, demand dedicated 20-amp circuits routed through subfloors to prevent breaker trips.
Drainage Routing, Water Lines, and Venting Systems
Freestanding plumbing introduces distinct drainage and venting challenges. Supply lines must route securely through drilled floor joists over crawlspaces or within trenches saw-cut into slab foundations. Because an island lacks an adjacent wall to run a standard vertical vent stack through the roof, licensed plumbers install engineered island loop vents or local code-approved air admittance valves. These mechanical assemblies equalize air pressure, protect P-trap water seals, and prevent dangerous sewer gases from entering living areas.
Ventilation Considerations for Island Cooktops
Placing a cooktop on an island demands robust capture performance to protect indoor air quality:
- Downdraft extractors: Retractable or surface-level downdrafts draw grease and steam downward, channeling exhaust through ductwork concealed beneath the floor joists to an exterior wall.
- Ceiling-mounted hoods: Suspended chimney hoods capture rising thermal plumes directly above the cooktop. These units require structural wood blocking between ceiling joists to bear the mechanical weight securely.
Coordinating plumbing trenches, structural framing, and high-voltage wiring requires unified project management. Entrusting these rough-ins to experienced kitchen remodeling professionals guarantees that every pipe, conduit, and duct meets local municipal codes on the first inspection.
Custom Built-In Islands vs. Prefabricated Cabinets: Construction Comparison
Homeowners often evaluate whether a factory-assembled modular unit or a fully custom build makes sense for their kitchen footprint. While prefabricated flat-pack cabinets offer convenient delivery, they rely on standardized sizing, lightweight particleboard carcasses, and thin back panels. Professional kitchen island installation services favor custom or semi-custom builds because they allow tailored storage solutions, such as deep vertical pan dividers, motorized spice pull-outs, and dedicated appliance garages. More importantly, custom millwork delivers the structural integrity required to support massive modern finishes safely.
Structural Subfloor Anchoring and Base Framing
A freestanding island lacks adjacent wall studs to resist lateral movement, making internal framing critical. Solid stone countertops made of quartz, granite, or marble easily weigh several hundred pounds. Installing this load over prefabricated boxes resting on unanchored plastic leveling feet invites structural failure. Proper carpentry demands a reinforced internal framework:
- Subfloor cleating: Contractors fasten heavy-duty 2×4 lumber cleats directly into concrete slabs using masonry anchors, or through subfloors straight into underlying floor joists.
- Precision leveling: Existing subfloors are rarely dead level. High-density composite shims sit beneath solid plywood base boxes to establish a perfectly flat plane, preventing cracked stone seams and sticking drawers.
- Solid-core construction: High-grade 3/4-inch furniture plywood framing absorbs vertical loads effortlessly without bowing under heavy stone fabrication.
Countertop Cantilever Support and Seating Overhangs
Countertop seating introduces serious cantilever physics that standard retail island kits simply ignore. When a natural or engineered stone overhang exceeds 10 to 12 inches, the unsupported slab risks tipping or snapping along natural fault lines under downward pressure. To eliminate this safety hazard, experienced builders mortise heavy-gauge steel support brackets flush into the top edge of the cabinet framing prior to setting the stone slab.
These concealed steel plates disperse weight across the entire carcass, maintaining clean knee clearance without requiring obstructive wooden corbels or decorative posts. By combining anchored base plates with structural steel supports, custom kitchen island installation services deliver an enduring, stable surface built to handle lively family meals, food prep, and casual entertaining for decades.
The Step-by-Step Professional Kitchen Island Installation Process
Executing an island build requires an orderly, phased construction schedule. While online tutorials frequently suggest driving wood screws straight through cabinet backs into finished flooring, true architectural craftsmanship avoids such shortcuts. Professional kitchen island installation services follow a calibrated sequence that protects underlying structural layers, adheres to regional building codes, and ensures that trades work without conflicting with one another on-site.
Permitting, Layout-Mapping, and Floor Demolition
Work begins long before materials arrive. A licensed builder secures necessary municipal permits across Northern California jurisdictions, verifying that plumbing, electrical, and structural scopes align with regional codes. On-site execution starts with layout-mapping. Technicians snap laser-guided chalk lines onto the floor to pinpoint island footings down to the sixteenth of an inch. Installers then neatly cut through finished hardwood, tile, or laminate, exposing the foundational subfloor so utility runs and cleats anchor directly to structural framing rather than floating materials.
Mechanical Rough-Ins, Cabinet Anchoring, and Leveling
With the subfloor accessible, mechanical rough-ins proceed according to strict protocol:
- Subfloor trenching and drilling: Plumbers and electricians run supply lines, PVC drainage, and metallic conduit directly up into the island’s utility bay footprint.
- Cleat installation: Carpenters fasten heavy framing lumber cleats into the subfloor using structural screws or expansion anchors.
- Box placement and alignment: Base cabinetry slides over the utility stub-outs and locks firmly into the anchored cleats.
- Precision leveling: Installers calibrate the cabinets using cross-line lasers, setting high-density shims to guarantee a completely level foundation across all axes.
Countertop Templating, Finish Trim, and Fixture Trims
Once base cabinets are secured and plumb, stone fabricators create high-resolution digital laser templates. These digital measurements account for subtle wall deviations, sink cutouts, and overhang dimensions. While the custom slab is shaped off-site, finish carpenters fit decorative end panels, furniture-style baseboards, and color-matched scribe moldings to deliver a seamless appearance.
Following countertop installation, licensed technicians return to make final mechanical connections. They set under-mount sinks, wire pop-up electrical receptacles, and hook up appliances before conducting rigorous leak and safety checks. To ensure your culinary center is built to exacting structural standards, explore the full-service kitchen remodeling options provided by licensed builders.
Why Hire a Licensed General Contractor for Your Island Addition
Adding a fully equipped island is fundamentally different from hanging a cabinet or swapping out a light fixture. It is an intricate construction project requiring structural, electrical, and plumbing specialists to work in synchronized choreography. Online directories often advise homeowners to hire separate trades or act as their own project manager. That approach frequently backfires into costly miscommunications, delayed handoffs, and voided warranties. Investing in turnkey kitchen island installation services from an experienced builder establishes a single point of responsibility across the entire build.
Single-Source Accountability and Seamless Trade Coordination
Managing independent subcontractors individually creates unnecessary friction. When a plumber’s drainage pipe conflicts with an electrician’s conduit pathway, unmanaged trades point fingers, leaving you caught in the middle. A licensed general contractor provides unified leadership. One dedicated project manager directs the schedule, oversees material staging, and ensures that every trade executes according to the master architectural plans. This centralized oversight prevents scheduling delays, streamlines municipal inspections, and keeps daily progress on track without disrupting your household routine.
Protecting Your Home Investment with Expert Craftsmanship
Beyond efficient scheduling, a licensed builder safeguards your home’s long-term value and structural integrity:
- Insurance protections: Fully licensed contractors maintain comprehensive workers’ compensation and general liability insurance, shielding you from property damage and job-site liabilities.
- Regulatory compliance: Experienced builders navigate complex regional mandates, including California Title 24 energy standards and local building codes, guaranteeing all installations pass final inspection.
- Integrated renovations: If your island project connects with a broader home addition or full kitchen remodel, a general contractor manages structural wall removals and flooring transitions under one coherent scope.
A well-built kitchen island elevates daily routines and adds enduring value to your residence. Choosing established kitchen island installation services ensures your project benefits from disciplined craftsmanship, meticulous site management, and dependable communication from foundation rough-ins to final trim. When you’re ready to transform your culinary space, scheduling a consultation with a licensed builder is the smartest first step toward bringing your vision to life.
Bring Your Dream Kitchen Island to Life with Confidence
A truly functional kitchen island requires far more than placing cabinetry in the center of the room. It demands rigorous spatial clearance evaluation, precise subfloor mechanical routing, and rock-solid base framing that supports heavy natural stone countertops safely for years to come. Prioritizing building code compliance and careful trade coordination ensures your culinary investment elevates daily living rather than creating frustrating bottlenecks.
Partnering with an experienced builder eliminates the stress of juggling uncoordinated trades. As a fully licensed and insured California general contractor with decades of residential construction experience, GTE Construction provides single-source project management across the San Francisco Bay Area and Sacramento communities. From architectural space planning and municipal permitting to utility rough-ins and custom finish carpentry, our team executes every detail with disciplined care.
Investing in turnkey kitchen island installation services ensures your renovation is built to last. When you are ready to expand your culinary horizons and add enduring value to your home, schedule a kitchen remodeling consultation with GTE Construction to bring your vision into reality.
Frequently Asked Questions
Can you install an island in a kitchen without running plumbing or electrical lines?
Yes, you can install an island strictly for dry food prep and storage without active utilities. However, modern electrical codes frequently require a future electrical provision, such as a rough-in conduit beneath the floor, even if no outlet is connected immediately. Professional kitchen island installation services evaluate these regional regulations across San Francisco and Sacramento homes to ensure simple storage islands remain code-compliant and adaptable for future homeowner needs.
How much clearance is legally required around a kitchen island by building codes?
While municipal building codes focus heavily on clear egress paths, industry design standards establish mandatory minimum clearances for safety. A functional walkway requires at least 36 inches of clearance, expanding to 42 inches for single-cook prep zones and 48 inches for multi-cook configurations. In Alameda and Contra Costa County homes, licensed contractors verify these clearances against full appliance door swings to prevent hazardous bottlenecks during daily family routines.
What happens if my concrete slab floor needs trenching for island plumbing?
Trenching involves making clean, precise cuts into the concrete using dust-controlled diamond saws to form a narrow utility channel. Plumbers then place new water supply lines and drain pipes within the trench before pouring structural concrete to patch the slab flush with the surrounding floor. Licensed general contractors perform sub-surface scans beforehand to ensure tension cables or structural rebar remain completely undamaged throughout excavation.
Is a building permit required to install a kitchen island with electrical outlets?
Yes, municipal building departments throughout Northern California require permits whenever new electrical circuits, wiring, or plumbing lines are added to a home. A licensed builder submits detailed architectural plans and mechanical layouts to your local building agency, managing both rough-in and final inspections. Securing permits guarantees that all utility work complies with California Title 24 standards, safeguarding your home insurance coverage and long-term property value.
Can my existing subfloor support a large island with a heavy quartz countertop?
Most standard subfloors accommodate heavy stone surfaces without issue, but older homes with wide joist spans over crawlspaces often require structural reinforcement. A general contractor evaluates joist sizing, spacing, and subfloor thickness before anchoring the island base framing. If framing displays deflection, carpenters sister existing joists or install supplemental post supports below to bear multi-hundred-pound solid stone slabs safely without floor bounce.
How do licensed general contractors vent a kitchen sink installed in an island?
Because freestanding islands lack nearby walls for vertical vent stacks, contractors install engineered island loop vents or approved air admittance valves. A loop vent routes piping upward inside the cabinet above the sink’s flood level rim before descending into the subfloor to connect with the home’s main vent stack. This engineered loop equalizes drainage pressure, keeps P-traps functioning, and prevents sewer gases from entering your living space.
Can an island be added without replacing the existing kitchen hardwood or tile flooring?
Yes, an island can be added over existing flooring if the scope involves minimal mechanical routing. When utility rough-ins require subfloor access, comprehensive kitchen island installation services carefully cut along plank seams or grout joints. Installers then conceal the floor transition beneath custom furniture-style baseboards and decorative scribe moldings, leaving the surrounding kitchen tile or hardwood intact while maintaining a flawless built-in appearance.